As a member of the Plus QA development team, I greatly enjoy working on our test case management tool Test Platform, especially when there is a new feature or design to implement. I always try my best to replicate what is presented in new design documents as closely as possible. Occasionally though, adjustments need to be made to accommodate real-world data that wasn't obvious in the design phase, and often those adjustments involve insufficient space for text.

I could always wrap the text or have it trail with an ellipsis, but what if I want the whole thing to be displayed and also not disrupt the layout? This question is what motivated me to figure out how to dynamically resize text in a container. I decided to solve this by creating a function that would handle it.

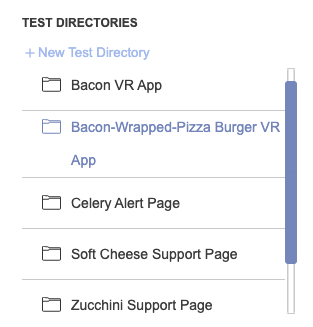
For this example we are going to look at Test Platform's test cases page, specifically the Test Directories list. As you can see we have a very important and very real directory title that is wrapping to the next line. To limit the size of each list item we have a character limit set for the directory titles, but occasionally there is a title that has many large uppercase characters and doesn't quite fit.
So how to dynamically resize text then? Using canvases of course! HTML Canvas has an awesome built-in method called measureText that can return the pixel width of specified text. Below you can see our completed resize function. At Plus QA we use React primarily for our front-end work but you could easily modify this function to work with your favorite JavaScript framework.
resizeText = (txt, maxWidth, fontSize) => {
// canvas created in constructor
// this.canvas = document.createElement("canvas").getContext("2d");
this.canvas.font = `${fontSize}px Arial`;
var minFontSize = 10;
var width = this.canvas.measureText(txt).width;
if (width > maxWidth) {
var newfontSize = fontSize;
var decrement = 1;
var newWidth;
while (width > maxWidth) {
newfontSize -= decrement;
if (newfontSize < minFontSize) {
return { fontSize: `${minFontSize}px`};
}
this.canvas.font = `${newfontSize}px Arial`;
newWidth = this.canvas.measureText(txt).width;
if(newWidth < maxWidth && decrement === 1){
decrement = 0.1;
newfontSize += 1;
} else {
width = newWidth; }
}
return { fontSize: `${newfontSize}px` };
} else {
return { fontSize: `${fontSize}px` };
}
}
Basically what we are doing in this function is measuring a string using the measureText method and making decremental adjustments to the font size until it fits. Once a good font size is determined, an object is returned and combined with the list item's inline style using the spread operator.
{/* example jsx element */}
<span style={{color:"black",...this.resizeText(itemText, 200, 13)}}>{itemText}</span>
The function takes 3 parameters: a string to be measured by the measureText method, an integer representing the max width allowed in pixels, and an integer for the starting font size in pixels. The HTML canvas that will be used for measuring is declared globally in the class constructor (any kind of global declaration will work). This allows us to use the same canvas for every measurement rather than creating a new canvas every time the function is called.
this.canvas = document.createElement("canvas").getContext("2d")
I have hard-coded the font family name and minimum font size but you could easily add two additional parameters to the function to represent those variables. It's good to have a minimum font size so you don't end up with comically small text. (unless that's what you want! haha)

Most of the magic happens in the while loop. It decrements the font size by 1 and compares the updated text width against the max width with each iteration. Once the text width is less than the max width, the decrement amount is changed to 0.1 and the while loop continues from the previous width and font size. Using the larger decrement results in fewer iterations, while the small one provides us with more precise adjustments once the font size it narrowed now.
while (width > maxWidth) {
newfontSize -= decrement;
if (newfontSize < minFontSize) {
return { fontSize: `${minFontSize}px`};
}
this.canvas.font = `${newfontSize}px Arial`;
newWidth = this.canvas.measureText(txt).width;
if(newWidth < maxWidth && decrement === 1){
decrement = 0.1;
newfontSize += 1;
} else {
width = newWidth;
}
}
Finally, when the text width becomes less than the max width using the smaller decrement, the updated font size is returned by the function.
return { fontSize: `${newfontSize}px` };
Success!!


In conclusion, HTML Canvas can have useful applications outside of creating graphics and images. One of my favorite parts of programming is finding new ways to use a feature that go beyond what was initially imagined. Dynamically resizing text is just one of many creative uses for the Canvas measureText function.
Want to learn more about the unique features offered in our test case management tool? Select the contact button below or navigate to the Test Platform page. If you have any questions or comments about how to dynamically resize text with code, shoot us an email at devblog@plusqa.com

