Just like everyone else in the world, we at PLUS QA were hit hard by Covid-19. Our speciality is manual testing on real devices and once Covid hit, we suddenly had a whole lot of devices in an office that no one could work at. We quickly developed a system for tracking and checking out devices to allow testers to work from home. The system has worked out well, so well that we plan to keep using a hybrid office/home work model even after Covid ends–when, and if, it ever does.
With that said there are still some disadvantages of working from home for our particular business, one of them being that a tester is limited to the devices they have checked out. Sometimes a tester might want to quickly test a bug regression on a particular device they are not currently using, and before Covid happened, all they had to do was walk to the device lab and grab the device. Now, they are required to drive to the office to get the device or message other testers that are using the device and ask them to test it. This problem is what motivated us to set up a remote device lab.
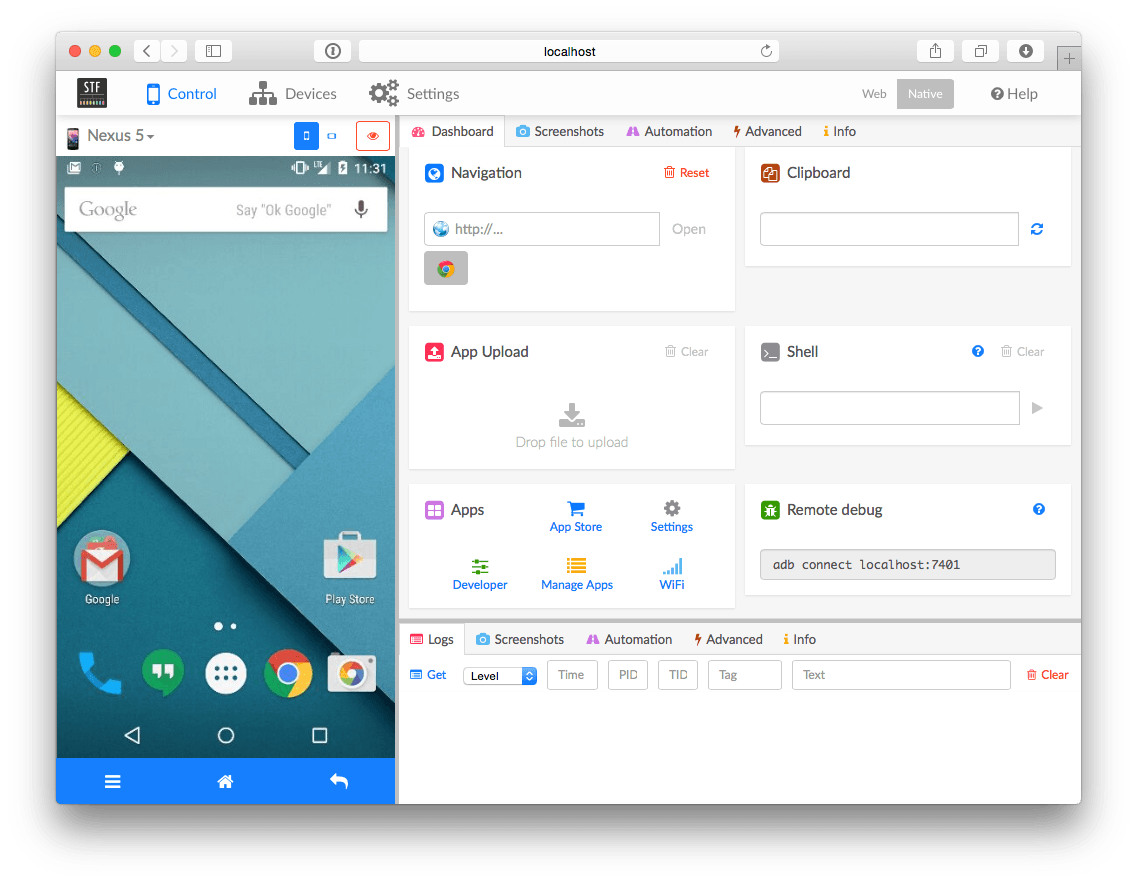
The goal of the remote device lab was to have a handful of iOS and Android devices set up at the office that we could mirror and control from a web browser, preferably through our existing web app Test Platform. For the Android devices, this was made possible using a great library called STF (or Smartphone Test Farm). For the iOS devices however, it was a little more complicated.

For the record, I’d like to say that I like Apple products, I don’t care who knows it. BUT as a developer, Apple doesn’t exactly make things easy. An Apple developer account costs money annually, the App Store release process is annoyingly rigorous, and access to internal functions of Apple devices is limited and often requires using Xcode. This limited access is why iOS devices do not work with STF. There is a separate repo on GitHub for getting STF to work with iOS devices but it isn’t super stable and I personally could never get it working.
I could have kept trying the STF route, but I wanted to find a different way to mirror and control an iOS device remotely for one simple reason: everyone online said it wasn’t possible.
In the video above I am controlling an iPhone SE located at the Plus QA office from my home computer’s browser. It turned out to not be as complicated as one might think. It’s basically a combination of two existing GitHub repos with a little extra javascript and python. Rather than getting into the specific code, I’d like to walk through my thought process that led me to successfully controlling and mirroring an iOS device from my browser. Don’t worry though, I do plan to eventually release a public repo of the whole project with detailed explanations of each step (check back soon!)
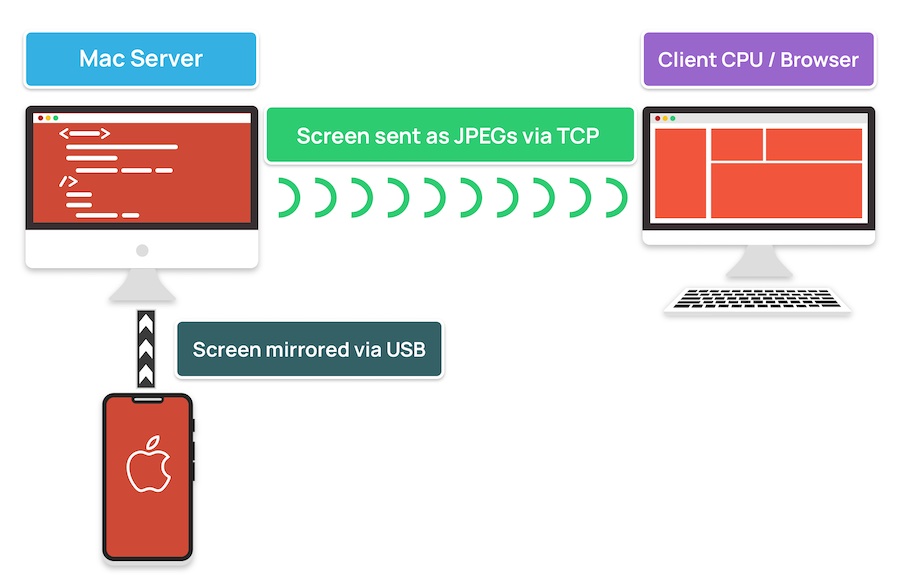
To start, I needed a way to mirror the screen and share the stream over the internet. For this I found an awesome Go program called iOS-screen-mirror. In a nutshell, this program grabs the screen of a usb connected iOS device and sends a feed of .jpegs to a designated TCP address. Then, I just needed to expose this location to the internet. There are, of course, a number of ways someone could do this (ngnix, ngrok, private vpn, etc).
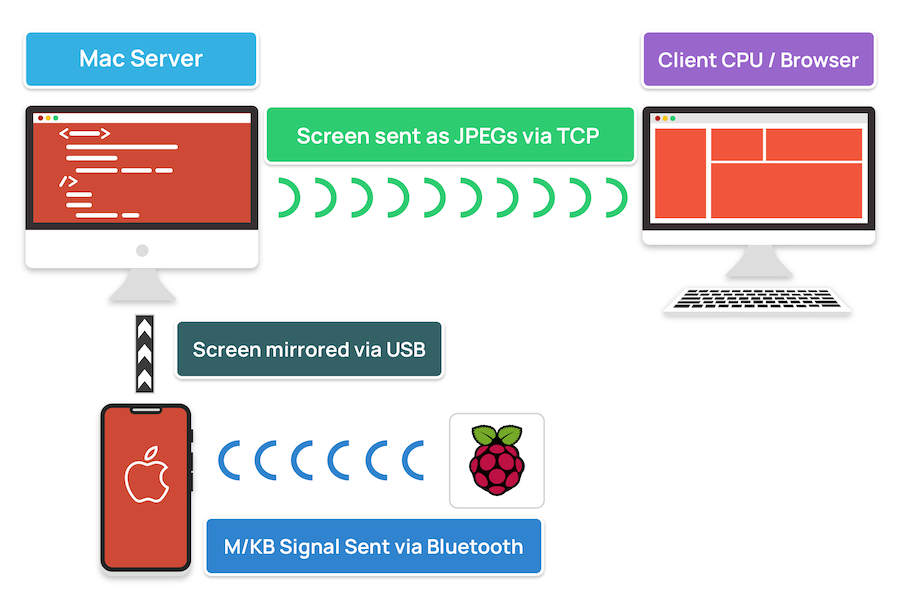
Next, there was the matter of having total control of the iOS device (easy, right?). This is where the Raspberry Pi came into play. Starting around iOS 13, Apple began allowing iOS devices to be controlled by any external mouse or keyboard, to provide better accessibility. This means you can wake up an iOS device, enter the pin, and navigate anywhere using a Bluetooth (or wired) mouse and keyboard.
I then came across a Python program called keyboard_mouse_emulate_on_raspberry. This program basically turns a Raspberry Pi into a bluetooth mouse and keyboard. The main purpose of the program is to convert a wired mouse and keyboard to Bluetooth by connecting them to the Raspberry Pi and having it emulate a Bluetooth mouse and keyboard. There is a less prominent function in this program that interested me more, however: the ability to send keyboard and mouse commands straight to the emulator rather than having to get them from a physically connected device. You can probably see where I’m heading with this. If I could send mouse and keyboard commands to the Raspberry Pi from a browser, those commands could then be sent to the Bluetooth connected iOS device.
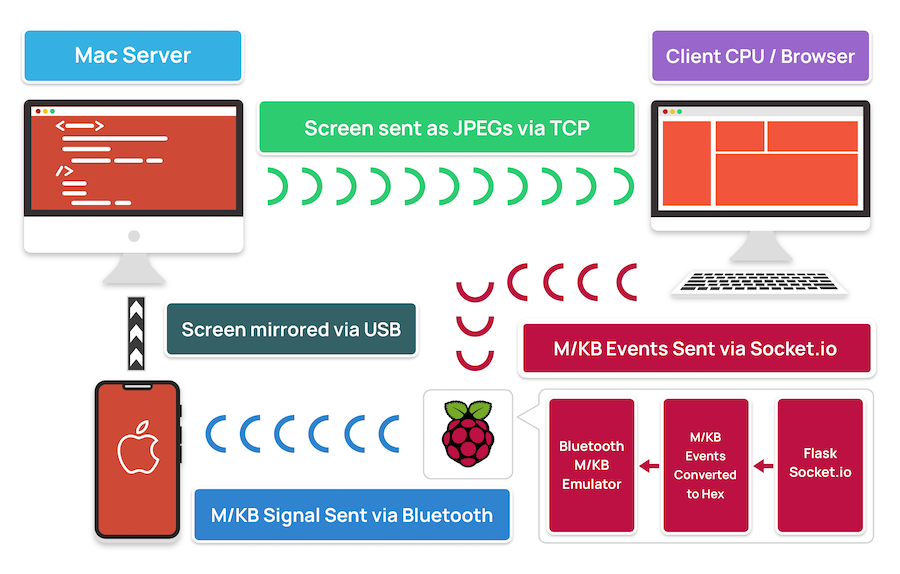
Now that I had a way to remotely mirror the device and a way to control it, I needed to connect the client’s mouse and keyboard commands to the Raspberry Pi. For this, I decided to use Flask and socket.IO. Flask is a simple and easy to use web framework written in Python, and socket.IO is a library that provides low latency communication between clients and servers. I integrated the Flask server into the mouse and keyboard emulator on the Raspberry Pi since they are both written in Python. The Flask server receives a mouse or keyboard event from the client via its own implementation of socket.IO (Flask-SocketIO) and sends it straight to the mouse and keyboard emulator. On the front end, I integrated the javascript version of socket.IO with the client facing side of the iOS-screen-mirror program. This allows us to communicate with the Flask server set up on the Raspberry Pi.
Sending the keyboard events was straight forward, I just needed to add a keydown event listener to the page. Sending the mouse events was a little more complicated.
To start, I added a mousemove event listener to the canvas element where the iOS device screen is rendered. This way the device’s software cursor is only affected when hovering over the device screen area. Setting the the device’s cursor location presented a challenge because of how iOS handles mouse movement.
When using an external mouse with an iOS device, the device’s software cursor location cannot be set using absolute position. That is to say you can’t tell the device to move the cursor to an exact xy position. Instead, it uses relative position, which means when you move the mouse it only tells the device’s software cursor the direction and how much to move from its current position. This is a problem for our setup because the location of the device’s software cursor will most likely not be in the same location as the client’s mouse cursor when it enters the canvas element, resulting in the cursor locations not being in sync. I came up with a couple tricks to work around this issue.
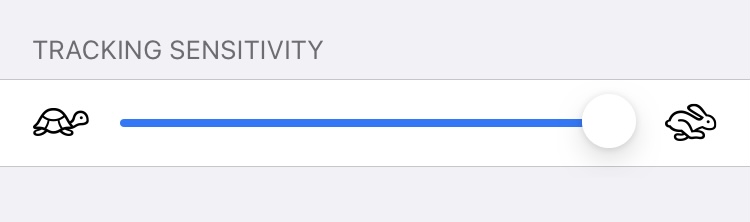
First, I opened the Accessibility menu on the iOS device and set the Assistive Touch’s tracking sensitivity to max.
Next, I added an element at the very center of the canvas that needs to be hovered over before the mouse events start being sent. This sets the center of the canvas as the starting point for tracking the physical mouse movements, making the available movement area equally distributed. I also added some padding around the phone display area. This padding is still within the canvas element and provides a little extra movement area for the physical mouse cursor if it happens to pass the edge of the phone display area.
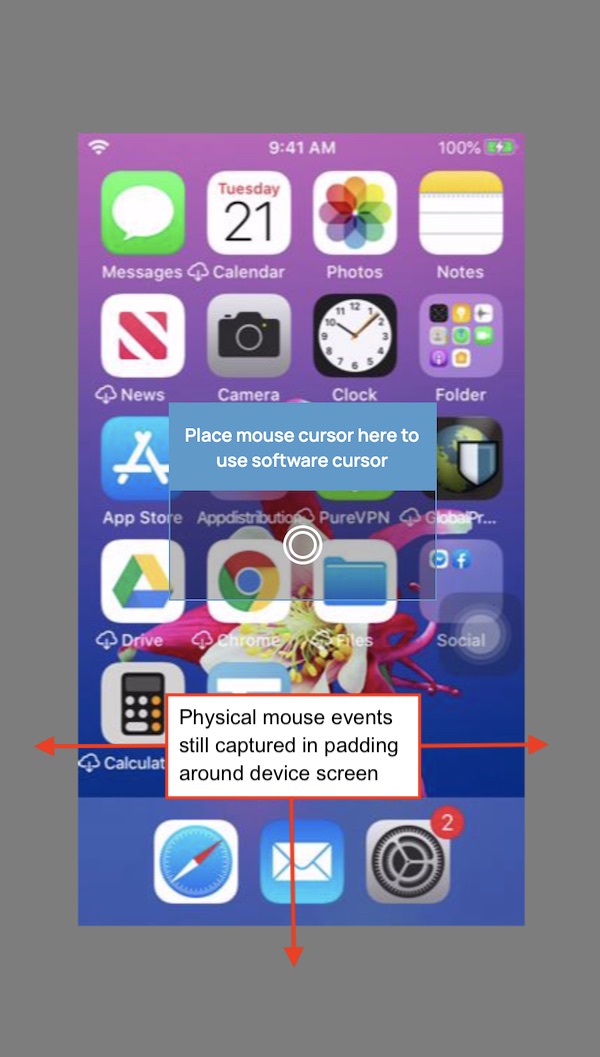
The distributed and extra movement area, combined with the high tracking sensitivity, allows the device cursor to be moved anywhere on the device screen before running out of movement space, regardless of where the device cursor started. Lastly, I made the physical mouse cursor be hidden when mouse control starts as to not confuse the user with two cursors that aren’t perfectly in sync with each other. Exiting the canvas element makes the physical mouse cursor reappear.
There you have it. Of course there are some limitation to this setup:
- No sound
- Requires iOS 13 or higher
- No landscape view
- Mouse movement can sometimes be a little laggy
Even with these limitations though, this setup allows us to easily test bug regressions without having a physical device in front of us.
In closing, I went into this project with little Python experience and zero Go experience, so most of the credit goes to the talented developers that created the screen mirroring program and mouse/keyboard emulator. However, persistence and creativity is what brought everything together and that is the most important takeaway. If you have any questions or comments about this post, shoot us an email at devblog@plusqa.com